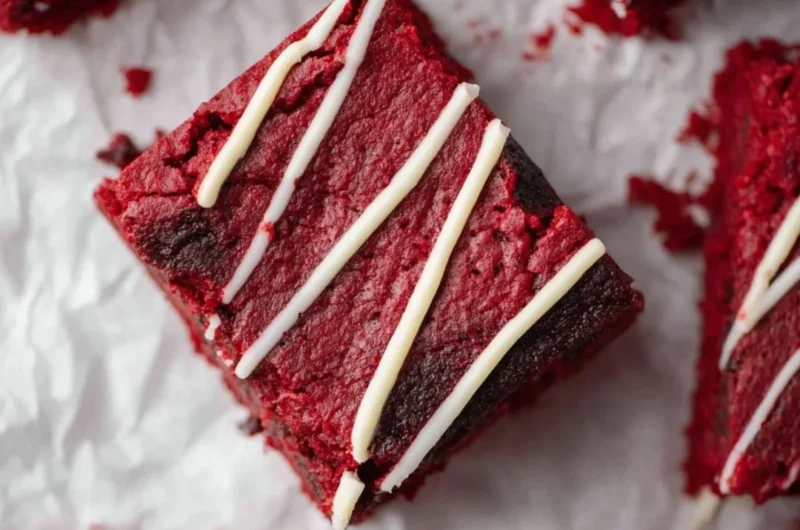
Cozy Red Velvet Brownies
Is there anything more comforting than diving into a batch of freshly baked brownies? As the sweet aroma wafts through the kitchen, nostalgia fills the air, reminding me of cozy afternoons spent baking with family. There’s something truly magical about the marriage of rich chocolate and the unique charm of red velvet. These Red Velvet Brownies are not just a treat; they’re a warm hug in dessert form, perfect for a special occasion or a simple Friday night indulgence.
Using just a few simple ingredients, you can whip up these delicious brownies that are sure to make your heart flutter. With their fudgy texture and a pop of vibrant red, they are a visual delight that’s as delicious as it is beautiful. This recipe is easy enough to enjoy as a weeknight dessert yet elegant enough for gatherings. This is one you’ll definitely want to pin for later!
Why You’ll Love This Recipe
- Quick and Easy: These brownies come together in just one bowl with minimal cleanup, making them perfect for those spontaneous baking cravings.
- Crowd-Pleasing Delight: The rich flavor and beautiful color make them a hit at any gathering.
- Customizable: You can add toppings or mix-ins that suit your taste, like creamy white chocolate chips or nuts.
- Fudgy Texture: The perfect balance of rich chocolate and velvety smoothness melts in your mouth, providing a delightful treat.
- Beautifully Presented: Their vibrant color and creamy drizzle of white chocolate make them as pretty as they are tasty, perfect for sharing on Pinterest.
What You’ll Need
Gather These Simple Ingredients to Make Your Red Velvet Brownies:
- 3/4 cup unsalted butter (melted)
- 2 oz chopped semi-sweet chocolate bar
- 1 & 1/4 cup granulated sugar
- 2 large eggs
- 2 teaspoons vanilla extract
- 1 teaspoon white vinegar
- 1/2 tablespoons red gel food coloring
- 2 tablespoons unsweetened cocoa powder
- 1 & 1/4 cup all-purpose flour
- 1/4 teaspoon salt
- 1/2 cup white chocolate chips (optional, for mixing into the batter or drizzling on top)
How to Make Red Velvet Brownies
Let’s Make It Together using these cozy step-by-step instructions:
- Preheat your oven to 350°F and line an 8×8 inch baking pan with parchment paper, leaving some overhang for easy removal.
- In a large microwave-safe mixing bowl, melt the butter and chopped chocolate in the microwave in 30-second increments, stirring between each until fully melted and smooth.
- Add in the granulated sugar, mixing well to combine. Then, introduce the eggs one at a time, beating well after each addition to create a creamy mixture.
- Stir in the vanilla extract, white vinegar, and red food coloring, making sure it’s well combined.
- In a separate bowl, sift together the cocoa powder, flour, and salt to aerate the dry ingredients.
- Gradually add the dry mixture to the wet mixture, mixing until just combined. Be careful not to overmix, as this could lead to a tough brownie.
- If desired, fold in the white chocolate chips for an added layer of creamy sweetness.
- Pour the batter into the prepared 8×8 inch pan, spreading it evenly with a spatula.
- Bake in the preheated oven for approximately 30-35 minutes, or until a toothpick inserted into the center comes out with a few moist crumbs (not wet batter).
- Allow the brownies to cool completely in the pan before using the parchment to lift them out and cut into squares.
- For an extra special touch, melt some white chocolate and drizzle it over the top. Let it set, slice, and enjoy every bite!
Variations & Creative Twists
Looking to get creative? Here are some fun ways to customize your Red Velvet Brownies:
- Peanut Butter Swirl: Swirl in some creamy peanut butter before baking for a delectable nutty twist.
- Mint Chocolate Chip: Add mint chocolate chips for a refreshing, festive flavor, perfect for holiday gatherings.
- Coconut Topping: Sprinkle toasted coconut on top of the melted white chocolate for a tropical vibe.
- Cheesecake Layer: For a decadent twist, layer a cheesecake mixture on top before baking, creating a creamy contrast to the fudgy brownie.
Chef Emma’s Helpful Tips
Here’s how to make your brownies even better:
- Make-Ahead Advice: These brownies can be made a day in advance; just store them in an airtight container to keep them fresh.
- Ingredient Swaps: If you’re out of red gel food coloring, you can use beet juice for a natural alternative.
- Slicing Tricks: To get clean cuts, use a sharp knife and wipe it with a damp cloth between slices.
- Storage Suggestions: Store your brownies at room temperature for up to 3 days or refrigerate them for a week—if they last that long!
What’s Inside – Nutrition Breakdown
Each serving of these delightful Red Velvet Brownies contains:
- Serving Size: 1 brownie
- Calories: 230
- Carbohydrates: 32g
- Sugar: 18g
- Fat: 10g
- Protein: 2g
- Sodium: 80mg
Frequently Asked Questions
Can I make this ahead?
Absolutely! These brownies stay fresh for a few days and are great for meal prep desserts.
Can I use different ingredients?
Yes! Feel free to swap out the chocolate or use a different food coloring if red isn’t your style.
How do I store leftovers?
Store in an airtight container at room temperature for up to 3 days or in the fridge for longer freshness.
How long does it last?
Freshly made brownies will last about 3-4 days at room temperature and up to a week in the fridge.
A Cozy Closing Note
There’s something undeniably comforting about the act of baking—especially when it involves the magical combination of chocolate and a touch of elegance with red velvet. These Red Velvet Brownies are not just desserts; they are an opportunity to connect, share, and savor those moments of joy. Whether you’re enjoying them with loved ones or indulging in a quiet moment for yourself, these brownies will surely bring warmth to your heart.
Save this Red Velvet Brownies recipe to your Cozy Desserts board so it’s ready when you need a sweet treat! Happy baking!